Configure BIND DNS
This part is focused to get bind dns server to work as a master nameserver, dnssec doesn’t get setup for the moment but it will be added later! Before starting to configure things it’s time to point out some good measures and pitfalls.
Note
FreeBSD specific stuff
after the packages got installed the configuration will be under /usr/local/etc/namedb directory.
Enable and start bind dns server for the first time
So first things first, let’s enable bind dns server, so it will start up on boot time. After this bind dns server will create some directories and files we need or simply going to rename/remove in the process.
# sysrc named_enable=YES
named_enable: NO -> YES
# service named start
Starting named.
# service named status
named is running as pid 71596.
At this point named should be up and running but a few changes need to be made before it can act as a dns master. So let’s stop the service for now and continue with preperations.
# service named stop
Hint
the name for bind dns server in the system is named so we enable, start, restart or stop the service with the name named!
Setting up file and folder structure
The default installation will place a primary folder in /usr/local/etc/namedb directory but since this is a master and master zone lets rename it to master.
# cd /usr/local/etc/named
# mv ./primary ./master
Also rename the working directory to workdir.
# mv ./working ./workdir
Next create a directory for the zone, its good practice to name it like the domain.
# mkdir ./master/yourdomain.tld
Create a rndc.conf file
Every change made to the zones need to be updated in bind dns server, to communicate with bind dns server the rndc tool will be used. The tool communicates over TCP/IP with bind dns server so a secure way has to be setup to do so. First generate a configuration for rndc.
# rndc-confgen
This will generate a file called rndc.conf in /usr/local/etc/namedb directory with the following content.
# less /usr/local/etc/namedb/rndc.conf
key "rndc-key" {
        algorithm hmac-sha256;
        secret "your_very_secret_key";
};

options {
        default-key "rndc-key";
        default-server your_server_ip;
        default-port 953;
};
Note
The values in the example are not the one created by rndc-confgen!
The key is used in named.conf to enable bind dns server to accept commands from the rndc tool.
Create a zone file
At this point the zone file can be created and the needed informations can be added. As before, with the directory, the zone file is named like the domain.
# touch ./master/yourdomain.tld/yourdomain.tld
Now there should be a file named yourdomain.tld in a directory yourdomain.tld under /usr/local/etc/namedb/master.
# vi ./master/youdomain.tld/yourdomain.tld
$ORIGIN .
$TTL 3600       ; 1 hour
yourdomain.tld      IN  SOA ns1.he.net. you.yourdomain.tld. (
                                3000300    ; serial
                                14400      ; refresh (4 hours)
                                3600       ; retry (1 hour)
                                3600000    ; expire (5 weeks 6 days 16 hours)
                                3600       ; minimum (1 hour)
                                )
                        NS      ns1.he.net.
                        NS      ns2.he.net.
                        NS      ns3.he.net.
                        NS      ns4.he.net.
                        NS      ns5.he.net.
                        NS      ns2.afraid.org.
                        A       your_server_ip

$ORIGIN yourdomain.tld.

    your_server_name        IN      A       your_server_ip
    ;you don't need the next line but usally someone wants to run a webpage too
    www                     IN      CNAME   your_server_name
Note
comments in a zone file are started with a ;
So lets break down the content just a little, most of the following notes can be found in the bind dns server documentation too but for good measure let’s point them out anyway.
$ORIGIN .
.
.
.
$ORIGIN yourdomain.tld.
The $ORIGIN keyword acts as a substitution for the string that follows the definition on that line. So that it won’t be necessary to write the string in
all subsequencial entries. So instead of writing
www.yourdomain.tld. IN CNAME your_server_name
It’s possible to write the following in our zone definition.
www IN CNAME your_server_name
The next keword is $TTL and should be pretty easy to understand, it defines the time to live for a record and is a value in seconds.
$TTL 3600 ; 1 hour
The last line is the so called SOA record and it stands for Start Of Authority. It has a few arguments that define how records for this
authoritive zone should be handled. The RFC 1035 defines the SOA record data as followed.
+--+--+--+--+--+--+--+--+--+--+--+--+--+--+--+--+
/                     MNAME                     /
/                                               /
+--+--+--+--+--+--+--+--+--+--+--+--+--+--+--+--+
/                     RNAME                     /
+--+--+--+--+--+--+--+--+--+--+--+--+--+--+--+--+
|                    SERIAL                     |
|                                               |
+--+--+--+--+--+--+--+--+--+--+--+--+--+--+--+--+
|                    REFRESH                    |
|                                               |
+--+--+--+--+--+--+--+--+--+--+--+--+--+--+--+--+
|                     RETRY                     |
|                                               |
+--+--+--+--+--+--+--+--+--+--+--+--+--+--+--+--+
|                    EXPIRE                     |
|                                               |
+--+--+--+--+--+--+--+--+--+--+--+--+--+--+--+--+
|                    MINIMUM                    |
|                                               |
+--+--+--+--+--+--+--+--+--+--+--+--+--+--+--+--+
And this translates to the values in the zone file as shown below.
                              +--+--+--+--+--+--+--+--+--+--+--+--+--+--+
yourdomain.tld      IN  SOA   /   ns1.he.net.   /  you.yourdomain.tld.  / (
                              /                 /                       /
                              +--+--+--+--+--+--+--+--+--+--+--+--+--+--+
                              |                 |
                              |     3000300     |
                              +--+--+--+--+--+--+
                              |      14400      |
                              |                 |
                              +--+--+--+--+--+--+
                              |       3600      |
                              |                 |
                              +--+--+--+--+--+--+
                              |     3600000     |
                              |                 |
                              +--+--+--+--+--+--+
                              |     3600        |
                              |                 |
                              +--+--+--+--+--+--+
                              )
Since the RFC isn’t really pointing out the brackets, that enclose the values from serial to minimum, it’s possible that it’s just a way for the configuration parser to determine that the values belong to the values from the previous line. To get an explaination for every value you can take a look at RFC 1035 . This record is important for zone transfers to other namservers!
Important
the serial needs to be increase on every change that is made to the zone file!!!
The next entries under the SOA records are the name servers that will serve dns data for the zone when clients query for data.
NS      ns1.he.net.
NS      ns2.he.net.
NS      ns3.he.net.
NS      ns4.he.net.
NS      ns5.he.net.
NS      ns2.afraid.org.
Later we create slave zones on those servers so redundance is provided for our zone.
The last entry for the SOA record is the A record for our own server.
A your_server_ip
With this entry we associate yourdomain.tld. with your_server_ip so we can do a lookup.
Note
We don’t have a MX record under the SOA record, this is because we don’t have a MTA setup for now.
At this point the authoritive part of the zone file is done and it’s time to add the next records for our zone.
Again the $ORIGIN is defined first to ease the part of defining the records. The pattern is also the same as before
the only difference is that there are no values like on the SOA record.
$ORIGIN yourdomain.tld.

your_server_name        IN      A       your_server_ip
;you don't need the next line but usally someone wants to run a webpage too
www                     IN      CNAME   your_server_name
With this minimal zone file in place it’s time to move on to confiure the zone in named.conf.
Configure named.conf to use the zone file
Note
named.conf is only shown partly in this section!
First of let’s add the rndc key so it’s possible to issue commands to bind dns server from the rndc cli tool.
key "rndc-key" {
  algorithm hmac-sha256;
  secret "your_very_secret_key;
};
The next directive is necessary to define what servers or keys can control the configuration of bind dns server. Bind will listen on tcp port 953 on the external ipv4 address followed by a list of the allowed servers and keys.
controls {
    inet your_server_ip port 953
            allow {your_server_ip; 127.0.0.1; 69.65.50.192; keys { "rndc-key"; };
};
Next setup are a few access control lists, those are needed to declare what servers can issue normal or recursive queries to our server.
Note
acl is a convinient way to substitute a list of servers so DRY can be applied to declare access to those servers.
acl bogon {
        0.0.0.0/8;      // Null address
        1.0.0.0/8;      // IANA reserved, popular fakes
        2.0.0.0/8;
        192.0.2.0/24;   // Test address
        224.0.0.0/3;    // Multicast address
};

acl hurricane_slaves {          // This fetches from my master server
        216.218.133.2;          // slave.dns.he.net
        2001:470:600::2;        // This will do all zone transfers from our stealth master
};


acl hurricane_all_servers {     // ALL Hurricane server
        216.218.130.2;          // ns1.he.net - We send notify to this and use it in our SOA
        2001:470:100::2;        // ns1.he.net
        216.218.131.2;          // ns2.he.net - A slave answering for my domain
        2001:470:200::2;        // ns2.he.net
        216.218.132.2;          // ns3.he.net
        2001:470:300::2;        // ns3.he.net
        216.66.1.2;             // ns4.he.net
        2001:470:400::2;        // ns4.he.net
        216.66.80.18;           // ns5.he.net
        2001:470:500::2;        // ns5.he.net
        216.218.133.2;          // slave.dns.he.net
        2001:470:600::2;        // This will do all zone transfers from our stealth master
};

acl afraid_servers {
        69.65.50.192;
        2001:1850:1:5:800::6b;
};

acl internal_nets {
        10.0.0.0/8;
        172.16.0.0/12;
        192.168.0.0/16;
        2001:470:dc5d::/48;
        2001:470:28:10c::/64;
        82.182.181.104/31;
        155.4.8.28/32;
};
In the option part some files and directories are defined that are needed to run bind dns server. The more important part, working torward more security, are the
the allow- options. These options define what servers can query bind dns server for zone related information.
options {
        directory       "/usr/local/etc/namedb/workdir";
        pid-file        "/var/run/named/pid";
        dump-file       "/var/dump/named_dump.db";
        statistics-file "/var/stats/named.stats";
        listen-on port 53 { any; };
        //listen-on-v6    { ::1; };

        allow-query {
                localhost;
                internal_nets;
                hurricane_all_servers;
                afraid_servers;
        };

        allow-recursion {
                localhost;
                internal_nets;
                hurricane_all_servers;
                afraid_servers;
        };

        rate-limit {
                responses-per-second 6;
                log-only yes;
        };
};
After the option part we get a lot of predefined zones before we start adding our information at the end of the named.conf file. First we add another
config file with the include statement. This simply copies the content of log.conf into the named.conf on bind dns server startup.
// A lot of logging going to /var/log/named/*
include "/usr/local/etc/namedb/log.conf";
Next we need to add the the key that will be use to allow the slave servers to pull updates from the master.
key "yourdomain.tld" {
    algorithm hmac-sha256;
    secret "your_very_secret_key";
};
And finally we define our zone by simply providing the name and the zone file we created earlier. We also define who is allowed to transfer zone data.
zone "yourdomain.tld" {
        type master;
        file "/usr/local/etc/namedb/master/yourdomain.tld/yourdomain.tld";
        allow-transfer { localhost; internal_nets; afraid_servers; };
        notify explicit;
        also-notify { 216.218.130.2; 2001:470:100::2; 69.65.50.223; };
};
Setup slave servers
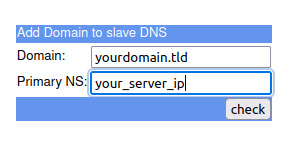
For now Hurrican Electric got a master zone but the new master zone is configured on the bind dns server now. This means the zone at the Hurrican Electric server can be removed and instead a slave zone will defined.
Hurrican Electric

As shown in the picture we use the TSIG Key defined in named.conf to allow the transfer of zone data from the master to the slave.
Important
The name of the key in the mask has to match the name of the key in named.conf
After the zone is successfully created the Hurrican Electric web UI should show a new entry.

To check if the Hurrican Electric update the zone its good practice to check the zone transfer logs on the master.
# tail -f /var/log/named/zone_transfers
06-Dec-2023 20:30:29.673 xfer-out: info: client @0x84680b760 216.218.133.2#37197/key yourdomain.tld (yourdomain.tld): transfer of 'yourdomain.tld/IN': AXFR started: TSIG yourdomain.tld (serial 3000309)
06-Dec-2023 20:30:29.674 xfer-out: info: client @0x84680b760 216.218.133.2#37197/key yourdomain.tld (yourdomain.tld): transfer of 'yourdomain.tld/IN': AXFR ended: 1 messages, 44 records, 3055 bytes, 0.001 secs (3055000 bytes/sec) (serial 3000309)
afraid.org
The afraid.org slave dns can’t be configured to use TSIG keys but we defined, in the acl section, the ip that can pull updates from the master server. So after creating an account on afraid.org it’s possible to define a backup dns in the web UI.

When the creation was successful and afraid.org was able to pull dns data from the master it will look like the following picture.
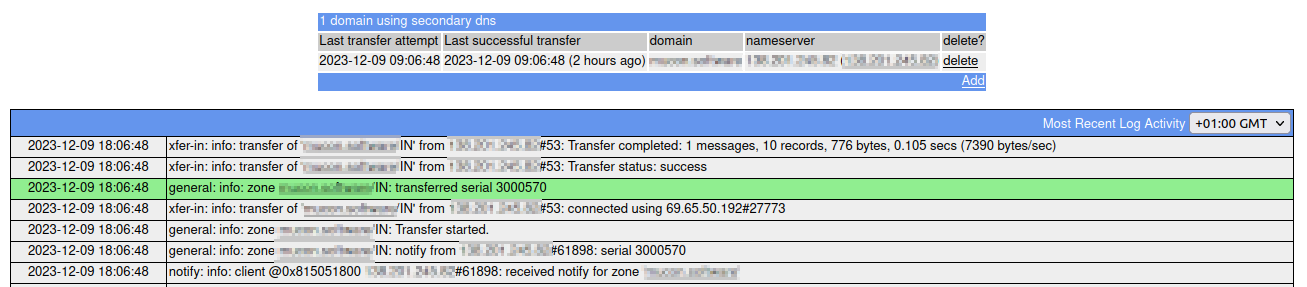
The logs on the master server will also show the transfer to afraid.org.
# tail -f /var/log/named/zone_transfers
09-Dec-2023 18:06:50.014 xfer-out: info: client @0x84680a960 69.65.50.192#27773 (yourdomain.tld): transfer of 'yourdomain.tld/IN': IXFR started (serial 3000550 -> 3000570)
09-Dec-2023 18:06:50.014 xfer-out: info: client @0x84680a960 69.65.50.192#27773 (yourdomain.tld): transfer of 'yourdomain.tld/IN': IXFR ended: 1 messages, 10 records, 776 bytes, 0.001 secs (776000 bytes/sec) (serial 3000570)
Testing the setup
Now that we configured bind dns server to serve our domain we want to make sure everything is working accordingly. To do this some tools provided by the
operating system like dig, ping and ping6 can be used.
Note
For some tests it might be nessesary to wait a while after starting bind dns server since the zone informations need to be promoted to the allowed nameservers.
Important
Testing of bind dns server needs to be done on a different machine then the one that runs the service!
There won’t be much of a detailed explaination of the commands or the output since this is not about the dig or ping tool. First example is simply
looking up the SOA of the domain and if successful the output should look like the example.
$ dig yourdomain.tld soa

; <<>> DiG 9.18.18-0ubuntu0.22.04.1-Ubuntu <<>> yourdomain.tld soa
;; global options: +cmd
;; Got answer:
;; ->>HEADER<<- opcode: QUERY, status: NOERROR, id: 37434
;; flags: qr rd ra; QUERY: 1, ANSWER: 1, AUTHORITY: 0, ADDITIONAL: 1

;; OPT PSEUDOSECTION:
; EDNS: version: 0, flags:; udp: 65494
;; QUESTION SECTION:
;yourdomain.tld.                        IN      SOA

;; ANSWER SECTION:
yourdomain.tld.         3552    IN      SOA     ns1.he.net. you.yourdomain.tld. 3000308 14400 3600 3600000 3600

;; Query time: 88 msec
;; SERVER: 127.0.0.53#53(127.0.0.53) (UDP)
;; WHEN: Tue Dec 05 16:43:30 CET 2023
;; MSG SIZE  rcvd: 92
This can be shorten to the most important bit of the query by the +short argument.
$ dig yourdomain.tld soa +short
ns1.he.net. you.yourdomain.tld. 3000308 14400 3600 3600000 3600
If the query fails then a SERVFAIL status will be returned. In this example there is no connection to the network so the local resolver on the machine will
try to go out and try to resolve the name but won’t get a response.
$ dig yourdomain.tld soa

; <<>> DiG 9.18.18-0ubuntu0.22.04.1-Ubuntu <<>> yourdomain.tld soa
;; global options: +cmd
;; Got answer:
;; ->>HEADER<<- opcode: QUERY, status: SERVFAIL, id: 8952
;; flags: qr aa rd ra; QUERY: 1, ANSWER: 0, AUTHORITY: 0, ADDITIONAL: 1

;; OPT PSEUDOSECTION:
; EDNS: version: 0, flags:; udp: 65494
;; QUESTION SECTION:
;yourdomain.tld.                        IN      SOA

;; Query time: 0 msec
;; SERVER: 127.0.0.53#53(127.0.0.53) (UDP)
;; WHEN: Tue Dec 05 17:10:20 CET 2023
;; MSG SIZE  rcvd: 43
Another example to look up information about the domain and no specific record is requested. Again the local resolver queries the nameservers of the domain
and gets your_server_ip as the answer.
$ dig yourdomain.tld

; <<>> DiG 9.18.18-0ubuntu0.22.04.1-Ubuntu <<>> yourdomain.tld
;; global options: +cmd
;; Got answer:
;; ->>HEADER<<- opcode: QUERY, status: NOERROR, id: 54169
;; flags: qr rd ra; QUERY: 1, ANSWER: 1, AUTHORITY: 0, ADDITIONAL: 1

;; OPT PSEUDOSECTION:
; EDNS: version: 0, flags:; udp: 65494
;; QUESTION SECTION:
;yourdomain.tld.                        IN      A

;; ANSWER SECTION:
yourdomain.tld.         2767    IN      A       your_server_ip

;; Query time: 0 msec
;; SERVER: 127.0.0.53#53(127.0.0.53) (UDP)
;; WHEN: Tue Dec 05 16:56:44 CET 2023
;; MSG SIZE  rcvd: 59
And again, if the noise isn’t needed there is a way to shorten the output.
$ dig yourdomain.tld  +short
your_server_ip
Let’s check the nameservers that will answer to queries about the domain.
Note
there is no entry for the actual master on the machine, only the Hurrican Electric and afraif.org servers are listed!
$ dig yourdomain.tld  ns

; <<>> DiG 9.18.18-0ubuntu0.22.04.1-Ubuntu <<>> yourdomain.tld ns
;; global options: +cmd
;; Got answer:
;; ->>HEADER<<- opcode: QUERY, status: NOERROR, id: 1089
;; flags: qr rd ra; QUERY: 1, ANSWER: 6, AUTHORITY: 0, ADDITIONAL: 13

;; OPT PSEUDOSECTION:
; EDNS: version: 0, flags:; udp: 65494
;; QUESTION SECTION:
;yourdomain.tld.                        IN      NS

;; ANSWER SECTION:
yourdomain.tld.         2698    IN      NS      ns3.he.net.
yourdomain.tld.         2698    IN      NS      ns1.he.net.
yourdomain.tld.         2698    IN      NS      ns2.afraid.org.
yourdomain.tld.         2698    IN      NS      ns5.he.net.
yourdomain.tld.         2698    IN      NS      ns4.he.net.
yourdomain.tld.         2698    IN      NS      ns2.he.net.

;; ADDITIONAL SECTION:
ns2.afraid.org.         260     IN      A       69.65.50.223
ns2.afraid.org.         214     IN      AAAA    2001:1850:1:5:800::6b
ns5.he.net.             39113   IN      A       216.66.80.18
ns5.he.net.             42971   IN      AAAA    2001:470:500::2
ns4.he.net.             39142   IN      A       216.66.1.2
ns4.he.net.             41287   IN      AAAA    2001:470:400::2
ns2.he.net.             70043   IN      A       216.218.131.2
ns2.he.net.             85350   IN      AAAA    2001:470:200::2
ns3.he.net.             70052   IN      A       216.218.132.2
ns3.he.net.             5138    IN      AAAA    2001:470:300::2
ns1.he.net.             40053   IN      A       216.218.130.2
ns1.he.net.             46936   IN      AAAA    2001:470:100::2

;; Query time: 51 msec
;; SERVER: 127.0.0.53#53(127.0.0.53) (UDP)
;; WHEN: Tue Dec 05 16:59:10 CET 2023
;; MSG SIZE  rcvd: 431
The short version again.
$ dig yourdomain.tld  ns +short
ns2.he.net.
ns3.he.net.
ns1.he.net.
ns2.afraid.org.
ns5.he.net.
ns4.he.net.
A simple ping to the machine is also possible. If you don’t get a response here you might need to check your package filter software for blocking of icmp packages.
$ ping yourdomain.tld
PING yourdomain.tld (your_server_ip) 56(84) bytes of data.
64 bytes from your_server_name.yourdomain.tld (your_server_ip): icmp_seq=1 ttl=47 time=48.0 ms
64 bytes from your_server_name.yourdomain.tld (your_server_ip): icmp_seq=2 ttl=47 time=72.6 ms
64 bytes from your_server_name.yourdomain.tld (your_server_ip): icmp_seq=3 ttl=47 time=52.0 ms

--- yourdomain.tld ping statistics ---
3 packets transmitted, 3 received, 0% packet loss, time 2004ms
rtt min/avg/max/mdev = 48.043/57.553/72.649/10.793 ms
Todo
add more examples …